Optional Post and Page Functionality
The essentials of creating posts is covered in this tutorial. This tutorial covers some optional WordPress features for working with posts and pages. We specifically discuss pages further in the next tutorial.
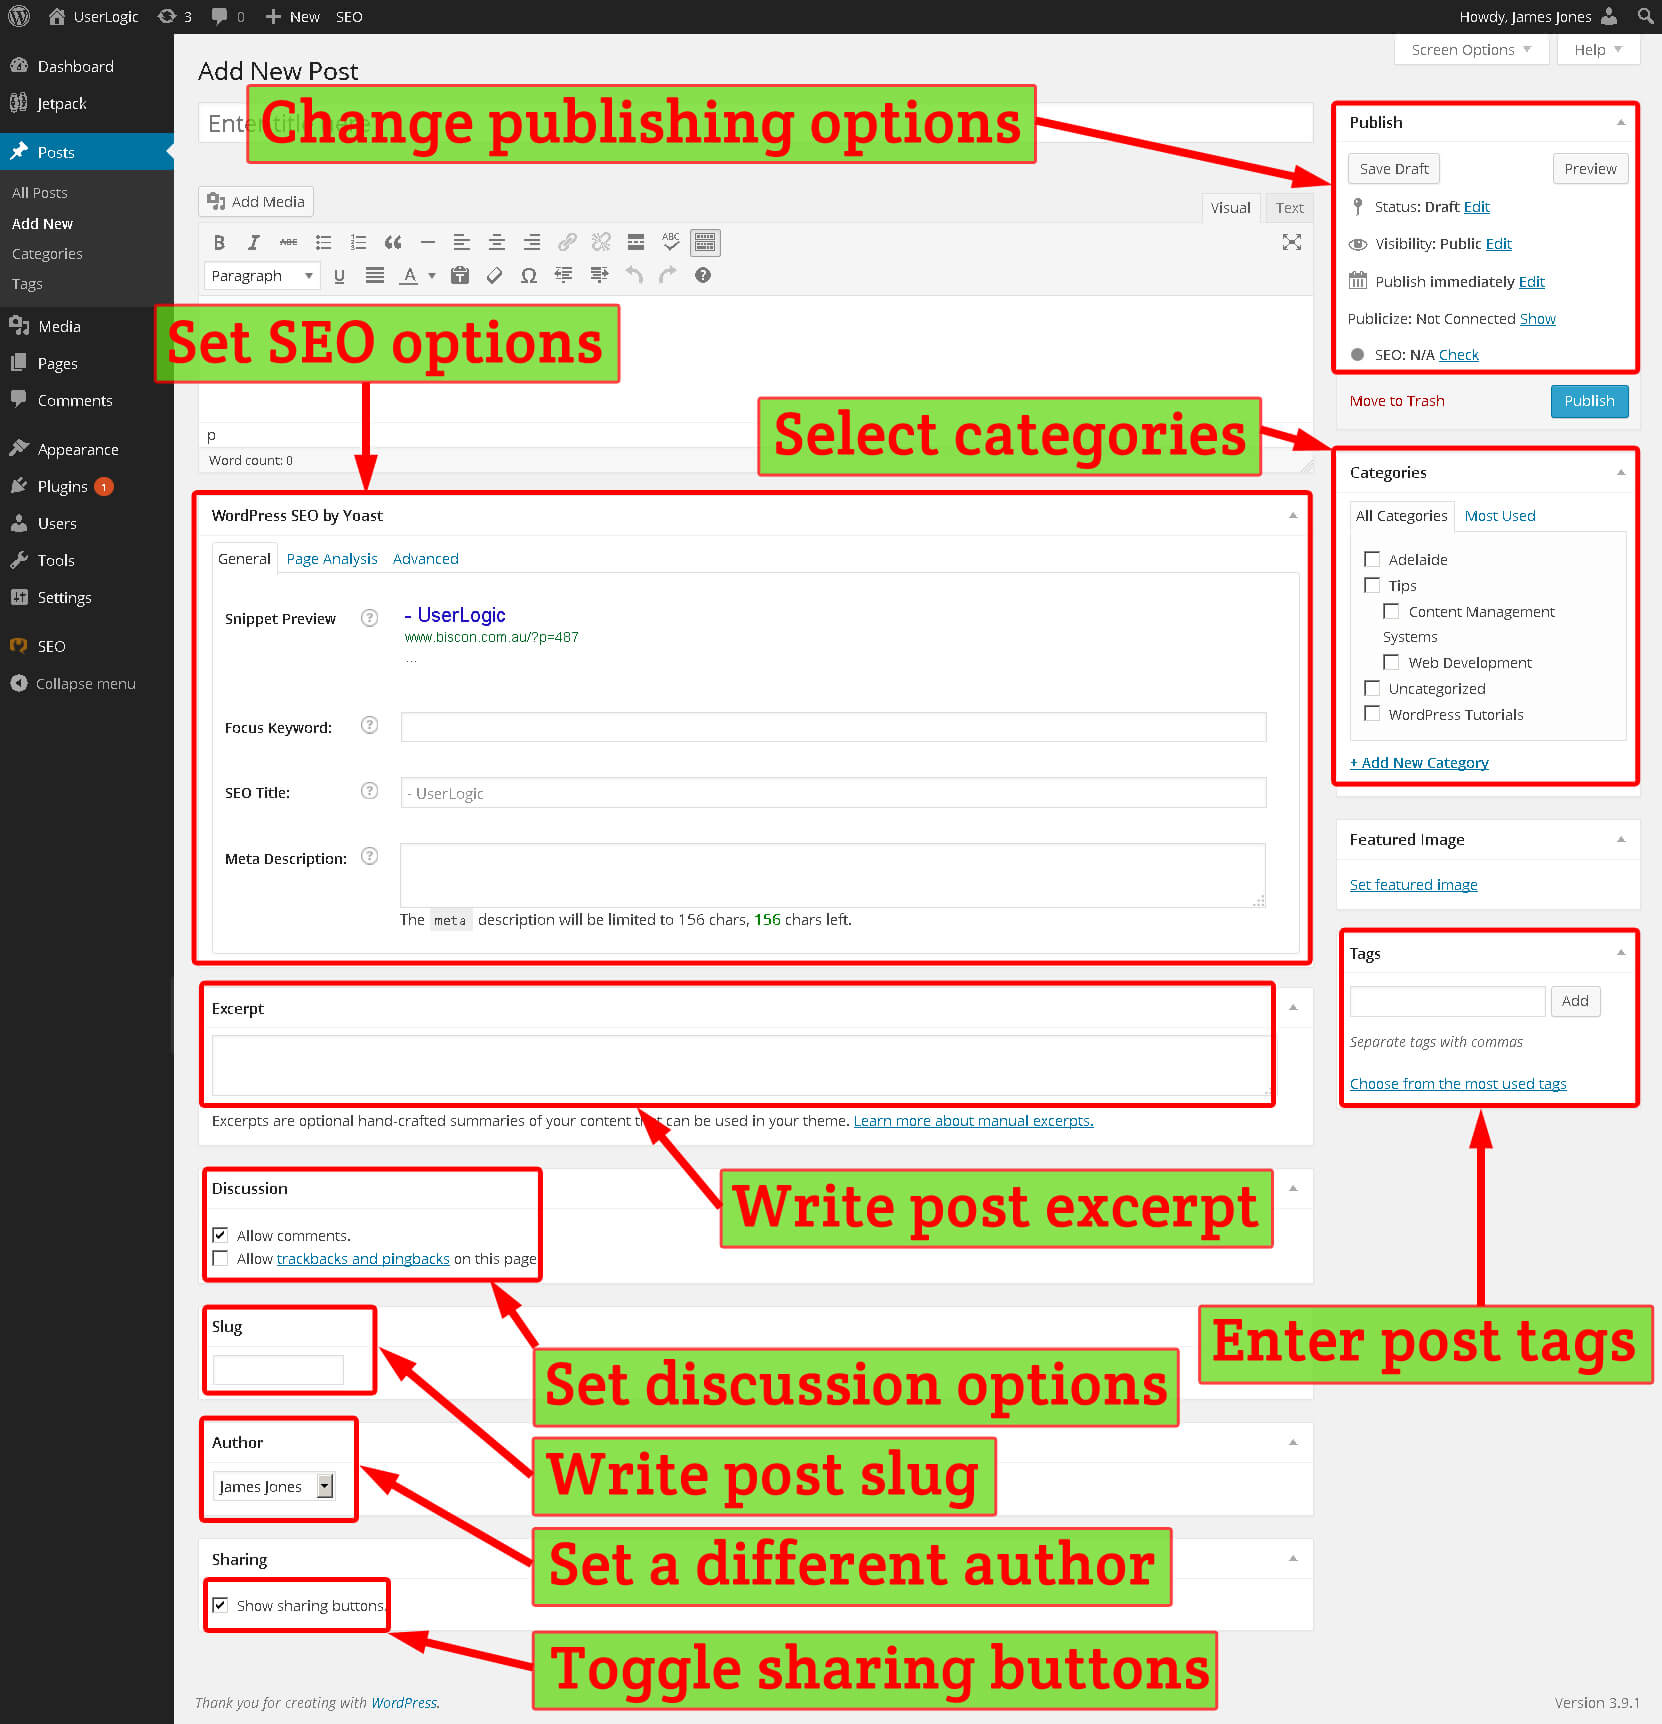
Categories
Categories are used to organise your posts making it easier to navigate your site. They also help with search engine optimisation. While they are technically optional it is highly recommended that you use categories. Categories are only used for posts and not pages.
To choose a category:
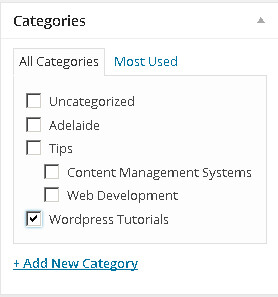
- While on the post editing screen tick the categories that you want the post to belong to. In the image below I’ve selected the ‘WordPress Tutorials’ category.
- You can choose more than one category for a single post.
- Categories can have parent categories. For example in the image below the ‘Tips’ category is the parent of the ‘Content Management Systems’ and ‘Web Development’ category. If you select one of these child categories, then the post would automatically be part of the ‘Tips’ category.
In this box you can also create new categories on the fly. To do so:
- Click the ‘+ Add New Category’ link.
- Type the name of the new category.
- Optionally select a parent category
- Click ‘Add New Category’.

Category Management
To organise your categories use the navigation menu to go to Posts → Categories to get to the categories management screen. From this screen you can add, edit and delete your site categories.
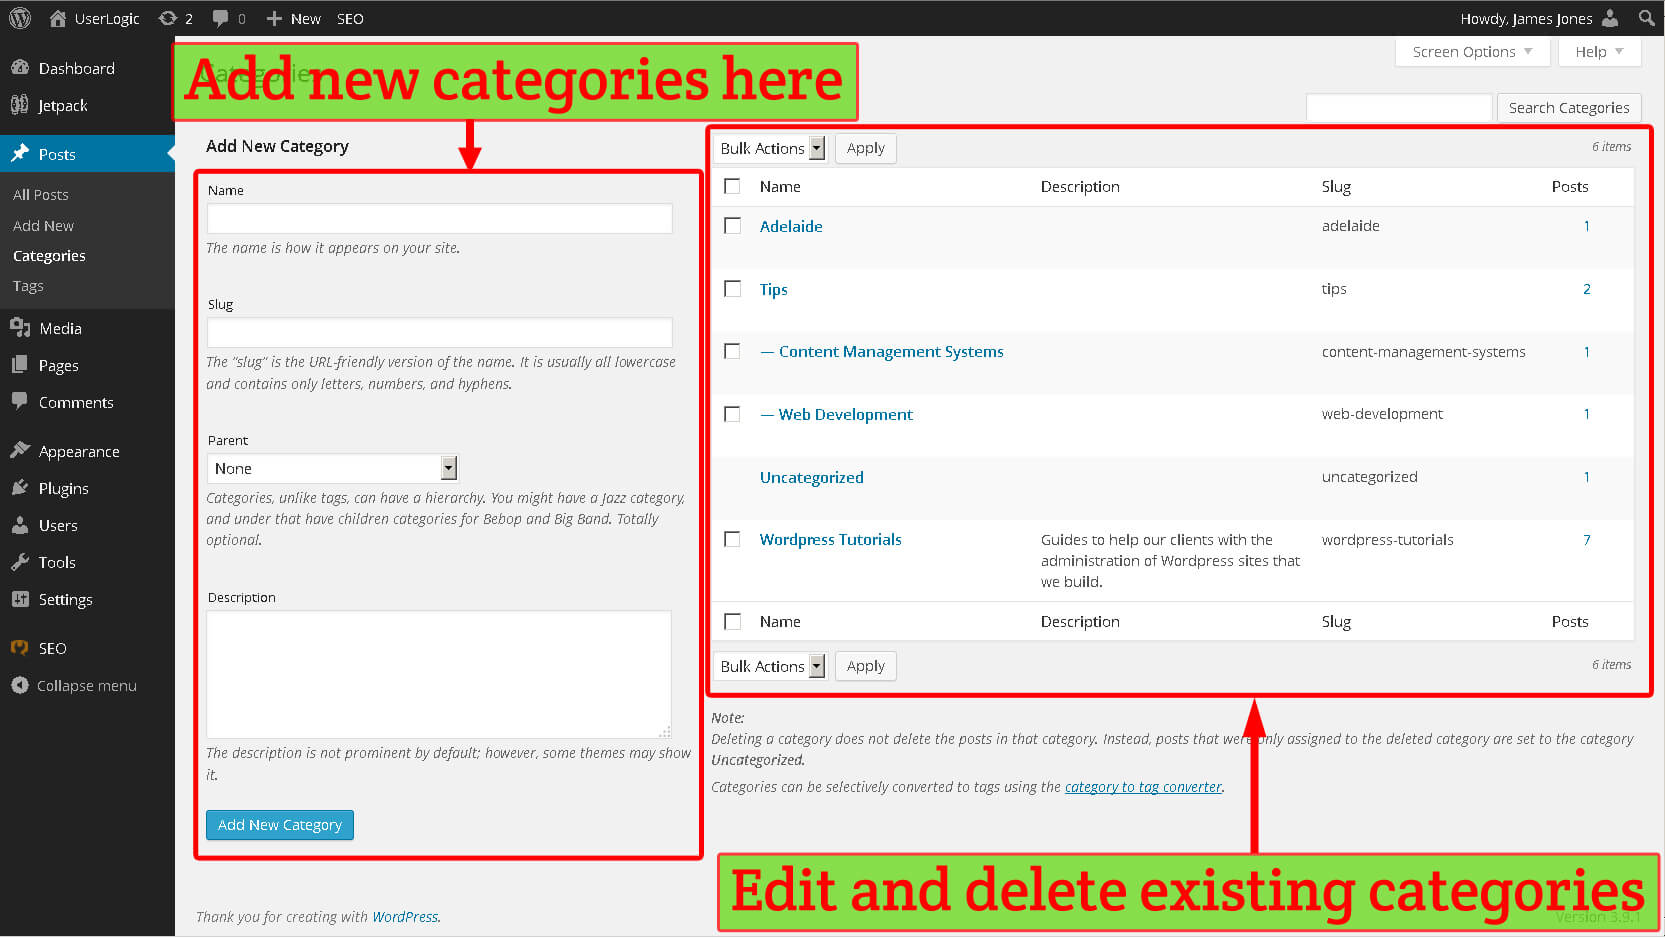
To add a category in this screen:
- Use the navigation menu to go to Posts → Categories
- The left hand side of the screen is the ‘Add New Category’ area
- Fill in the name of the category.
- Optionally fill in the slug, a version of the name used to build the web address for the page. If left blank this will automatically be set to the name field with lowercase letters and hyphens replacing spaces. So if the name of the category is ‘WordPress Tutorials’, the slug would be ‘wordpress-tutorials’.
- Optionally select a parent category for the new category.
- Optionally write a short description of the category. This sometimes shows in different WordPress themes. It is also handy for authors on your site to know when they should use certain categories in their posts
- Click ‘Add New Category’ on the bottom left of the screen.
To delete a category:
- Use the navigation menu to go to Posts → Categories.
- The right hand side of the screen is the category management area.
- Hover over an existing category and the ‘delete’ button will appear. Click ‘Delete’.
- If you have posts in the category you are deleting and they are not part of any other category, then they will be automatically put in the ‘uncategorized’ category.

To delete multiple categories at once:
- Use the navigation menu to go to Posts → Categories.
- In the category management area tick the categories you want to delete
- Open the ‘Bulk Actions’ drop down menu and select ‘delete’.
- Click ‘Apply’.

To edit a category:
- Use the navigation menu to go to Posts → Categories
- Hover over an existing category and the ‘Edit’ button will appear. Click ‘Edit’.
- Make the changes to the category.
- Click ‘Update’ on the bottom left of the screen.
Tags
Tags are a secondary way to organise your content in a little more detail than the categories described above. They are entirely optional.
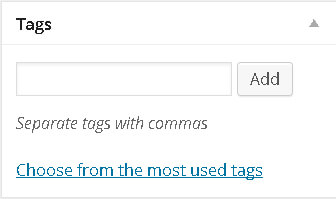
To add tags to your posts:
- In the ‘Tags’ box shown below type in the tags you want to add. In my example I’ve added the tags ‘posts’, ‘pages’, and ‘categories’.
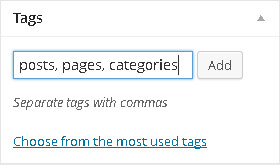
- If you are entering multiple tags at once, separate them with a comma as shown.
- Click ‘Add’.
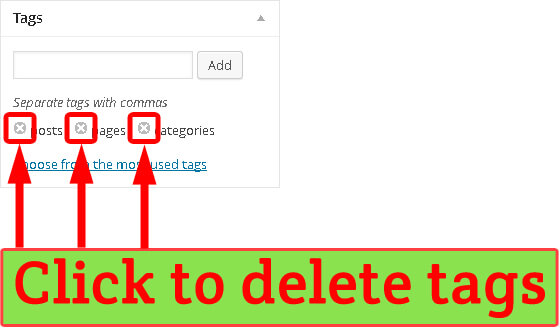
To delete a tag simply click the ‘x’ icon next to that tag.
Tag Management
You can organise tags in more detail in the tag management screen. To get there use the navigation menu to navigate to Posts → Tags
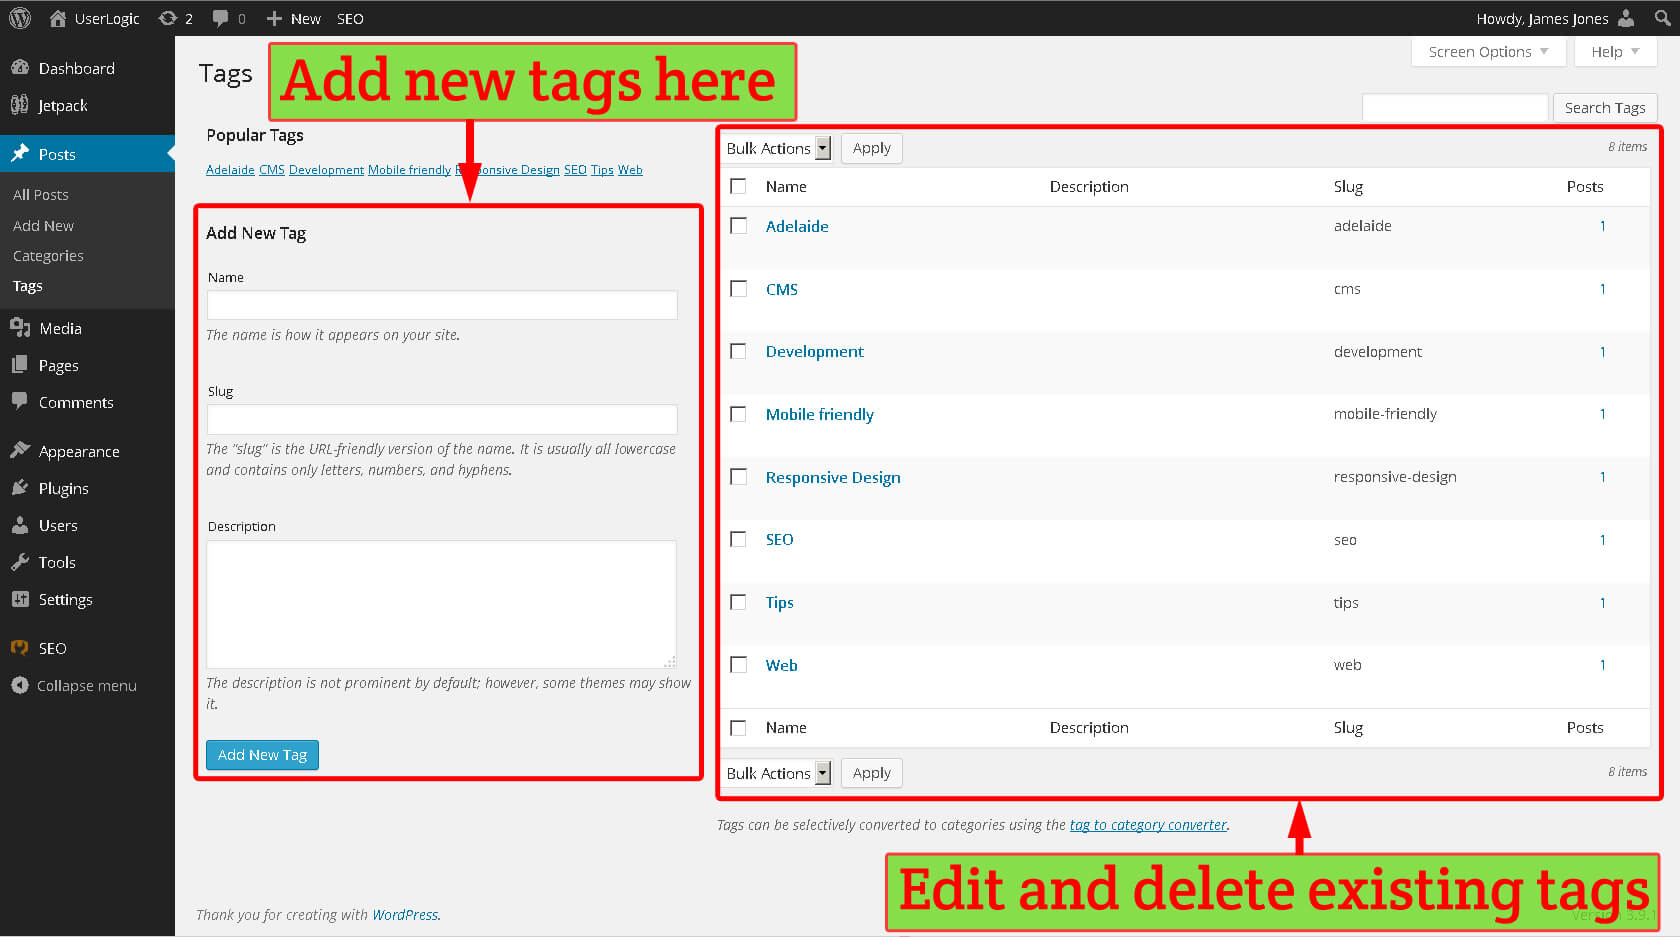
To add a new tag in the tag management screen:
- Use the navigation menu to navigate to Posts → Tags
- Use the ‘Add New Tag’ area on the left hand side of the screen
- Enter the name of the tag
- Optionally enter a slug for the tag. The slug is used to build the URL when it includes the tag. If left blank this will automatically be set to the name field with lowercase letters and hyphens replacing spaces. So if you entered the tag ‘Responsive Design’ the slug would automatically be ‘responsive-design’.
- Optionally enter a description. Some themes display this description.
To delete a tag:
- Use the navigation menu to go to Posts → Tags
- Hover over an existing tag and the ‘delete’ button will appear. Click ‘Delete’.
- If you have posts with the tag you are deleting they will no longer have that tag

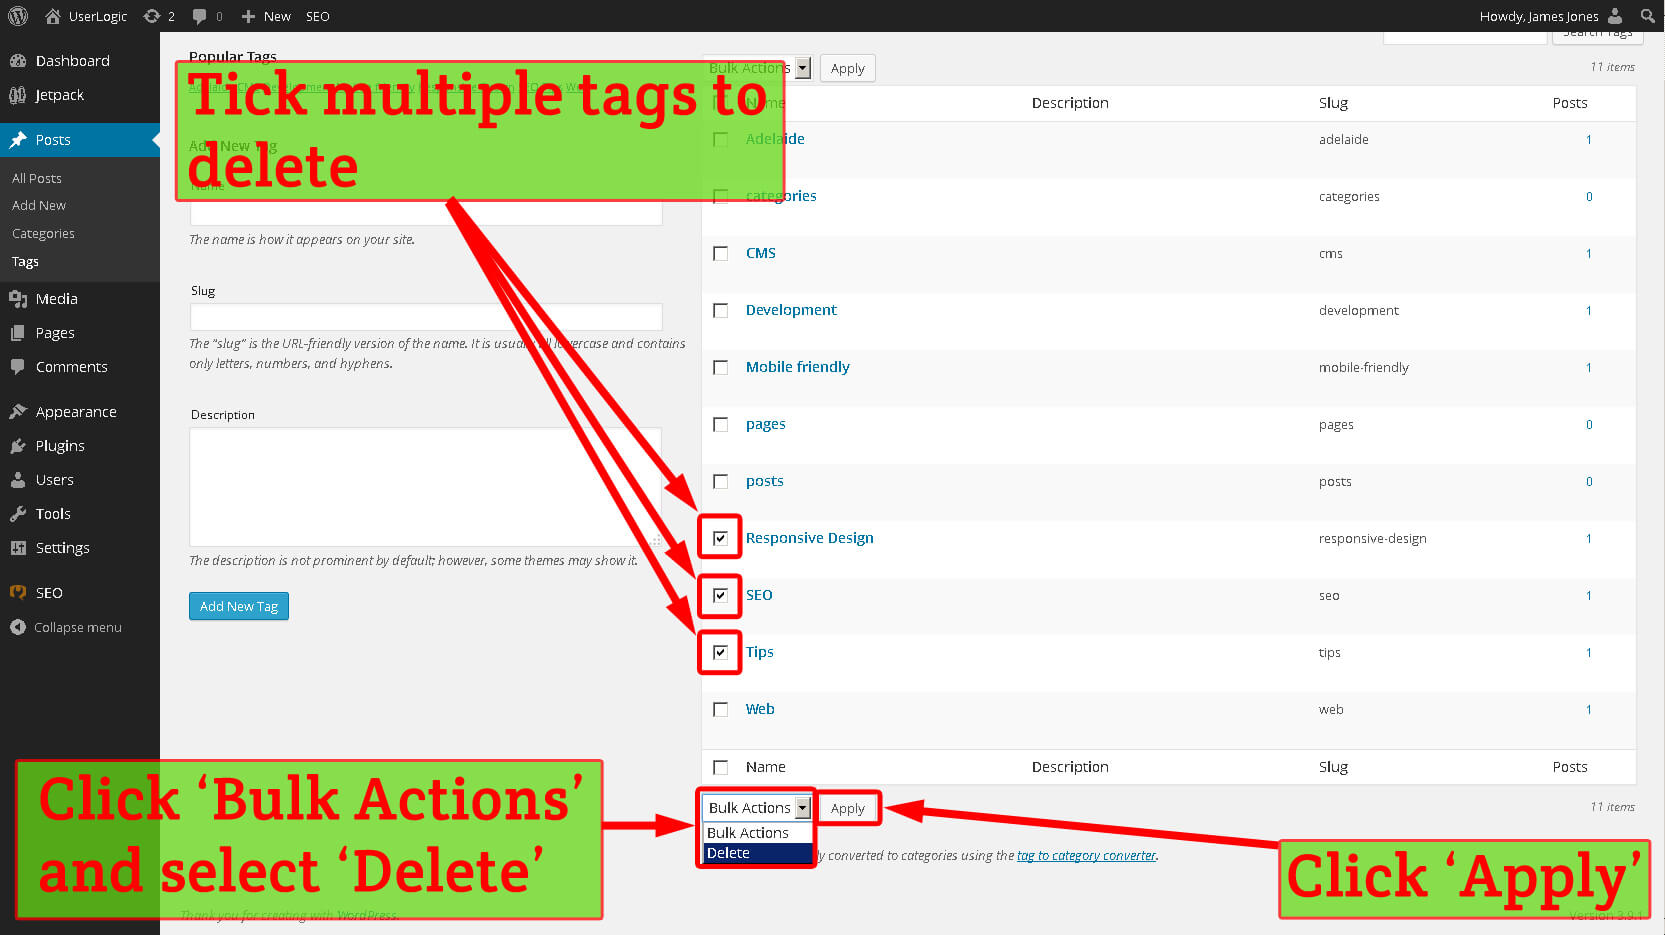
To delete multiple tags at once:
- Use the navigation menu to go to Posts → Tags
- In the tag management area tick the tags you want to delete
- Open the ‘Bulk Actions’ drop down menu and select ‘delete’.
- Click ‘Apply’.
To edit a tag:
- Use the navigation menu to go to Posts → Tags
- Hover over an existing tag and the ‘Edit’ button will appear. Click ‘Edit’.
- Make the changes to the tag.
- Click ‘Update’ on the bottom left of the screen.
Sharing
If we have set up social media sharing with the JetPack plugin installed for you, you will have the option to enable or disable sharing buttons on the page. Simply tick the ‘Show sharing buttons’ to enable or disable sharing buttons for that particular page. Most of the time you will want to show sharing buttons but there are some pages where it would seem a bit silly such as a ‘terms and conditions’ page or a ‘contact’ page.

Publishing
The simplest way to publish content is to click the ‘Publish’ button. The ‘Publish’ box has other handy functions if you want some more flexibility though they are entirely optional.
These functions are:
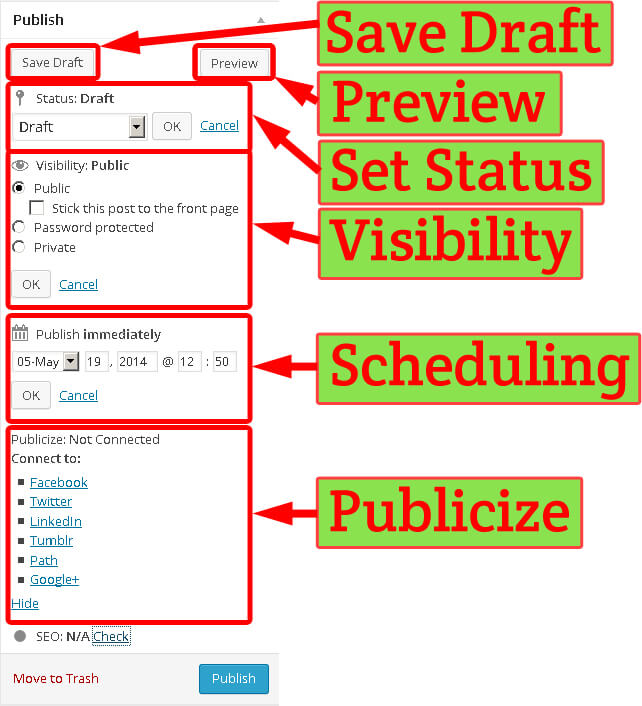
- Preview – Click this button for a preview of your page. It will open in another browser window
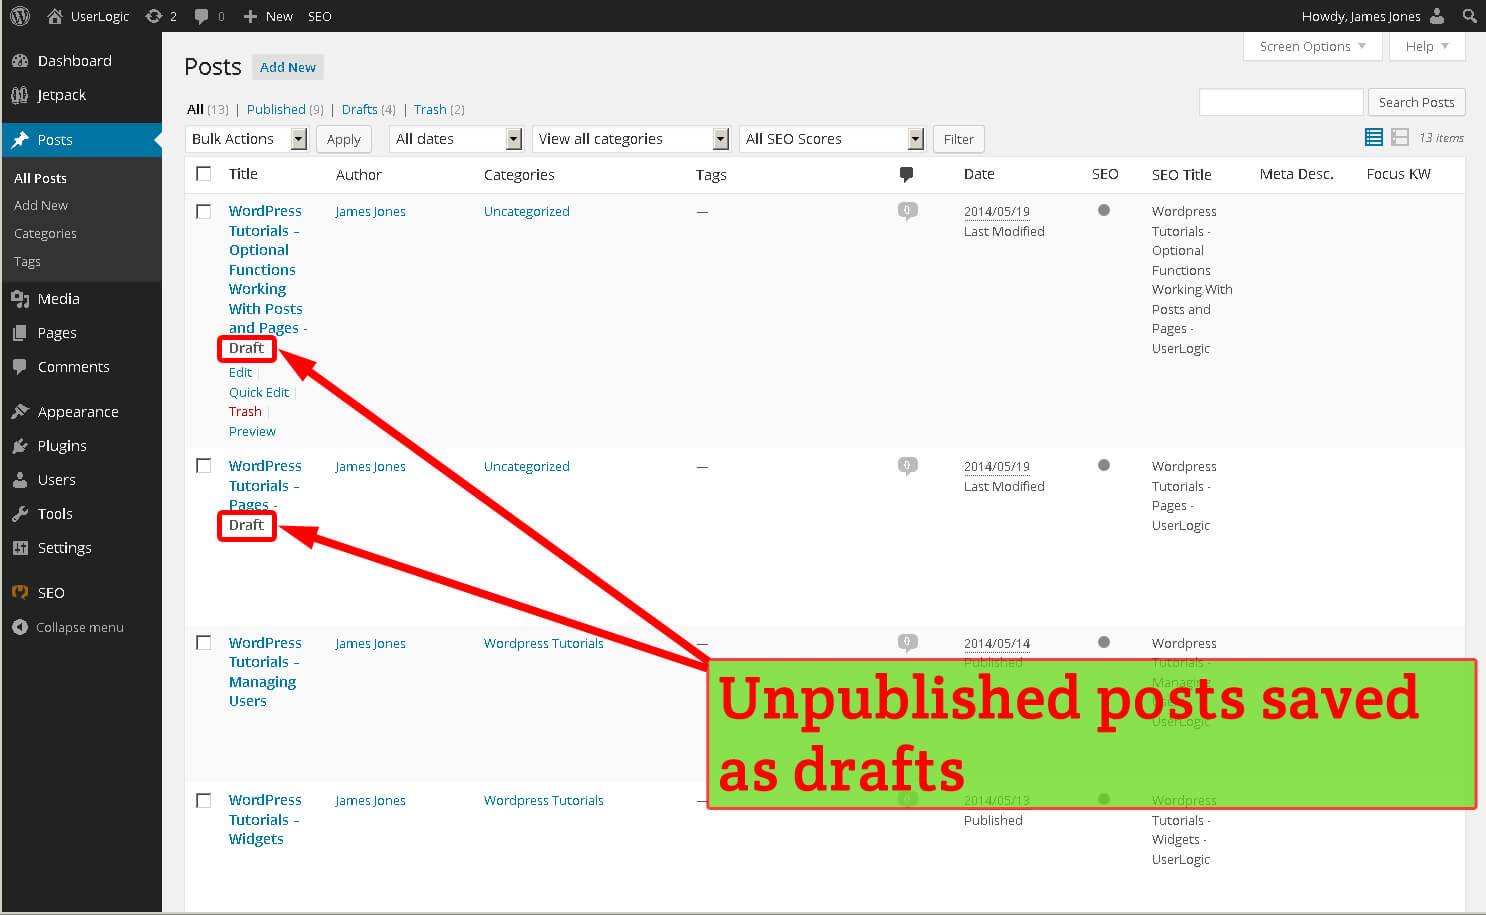
- Save Draft – If you can’t finish your page in one sitting you can save it as a draft. Once saved as a draft you can safely close the browser window until you want to work on the page again later. Draft posts are marked ‘Draft’ in the posts management screen shown below. Similarly Draft pages are marked ‘draft’ in the pages management screen.
- Status – Use the drop down to set the status of the post. Probably the most likely use for this is if you’ve published a post and want to set it back to being a draft so you can work on it again.
- Visibility – The options for visibility are
- Public – Set by default, the post is visible to everyone.
- Stick this post to the front page – This option is available for posts when your post is public.In most sites posts are shown is shown in reverse chronological order. Ticking this option will force the post to take precedence over newer posts.
- Password protected – Forces a visitor to enter the correct password before they can view the post. This is handy if you want to set up some sort of subscription service.
- Private – Posts set to private are only visible to users with the roles of Administrator or Editor. Read more about user roles in our user management tutorial.
- Public – Set by default, the post is visible to everyone.
- Scheduling – You can set the time and date to publish the post rather than post immediately. Examples of where this could be handy is if you want to publish something on a public holiday but don’t want to have to log in that day. Or maybe you finished your post at 2am but you don’t want to people to think you are crazy so you set the publishing time to 9am. Once you have set a schedule the ‘Publish’ button will change to a ‘Schedule’ button.
- Publicize – This is a feature of the JetPack plugin. If set up you can tick to automatically post to various social media sites about your new website content when you publish.
Discussion
One of the features of WordPress is that users can leave comments against posts. You can turn this feature on and off on a post by post basis.You can also set the default behaviour by using the navigation menu to go to Settings → Discussion.
For individual posts use the discussion options box shown in the image below to enable or disable comments. You can also enable and disable pingbacks and trackbacks. Trackback is a mechanism that will automatically place a link to your page on another site that has manually linked to your page and vice versa. To find out more about pingbacks and trackbacks visit this WP Beginner article.

Search Engine Optimisation
The WordPress SEO plugin adds a SEO box to your editing screen. You can optionally use this box to enhance the SEO of your page.
To enhance the SEO of your page:
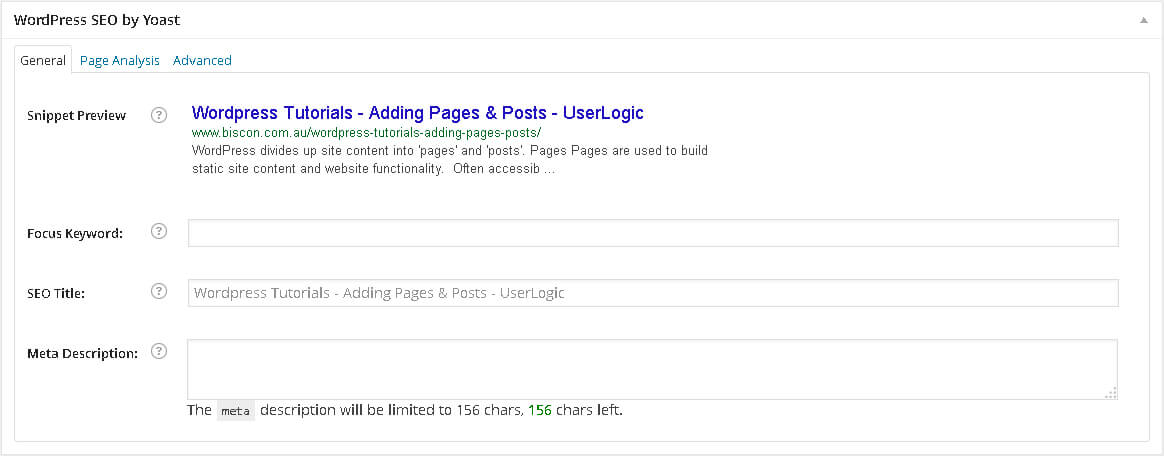
- If not already expanded, click the ‘WordPress SEO by Yoast’ tab.
- Write a SEO title. This is the page title that appears in the search engine results page. If you do not enter a title it will default to the title of your post
- Write a meta description. This is the snippet of text that appears below the page title. If not filled in this will default to be the first sentence or two from the start of your post.
- Write a focus keyword to analyse how often that keyword appears in your page. The focus keyword should be a keyword that you think people will use when searching for the sort of content you offer. For my example below I’ve used the word ‘WordPress’ . If there is a particular part of the page that doesn’t include this keyword at least once then you should try to add it in.
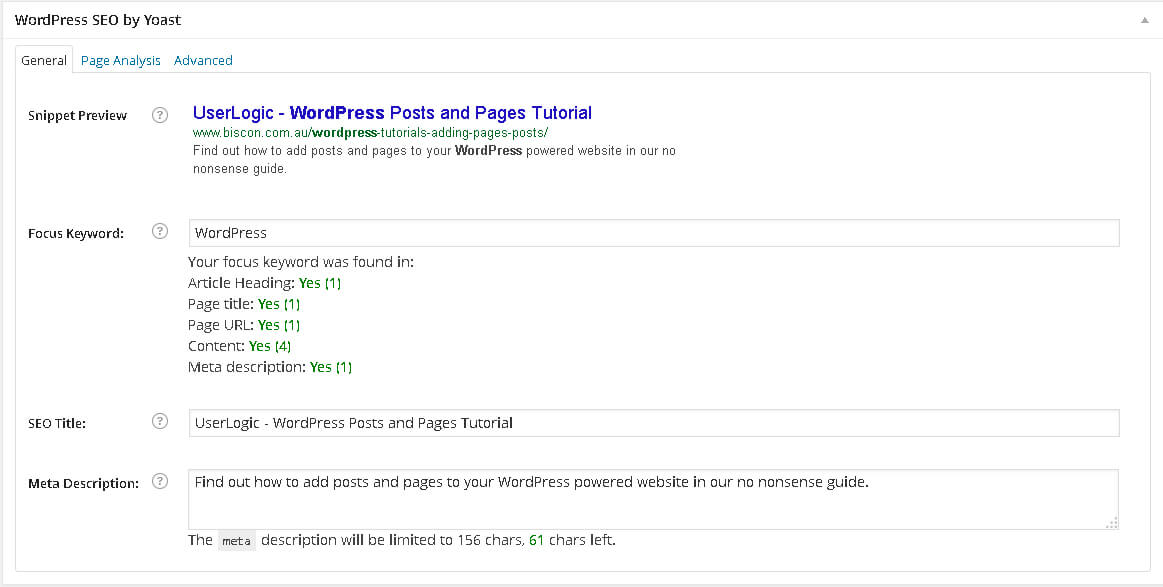
When you’ve saved your content for the first time you can click ‘Page Analysis’ to get some detailed feedback on things you can change to improve your SEO. Under the ‘Advanced’ tab there are more SEO options but these are not covered in this tutorial.
Excerpts
Normally when looking through an archive of posts, WordPress will display a snippet of the post content. Normally this is some text from the start of the post. Optionally you can replace this by writing a handcrafted excerpt. To add an excerpt, write some text in the ‘Excerpt’ text box shown below.

Slug
The slug is text that forms the web address of the page. Usually this is automatically set to the post title with spaces changed to dashes and capital letters changed to lower case. In addition if the ‘WordPress SEO’ plugin is installed then joining words like ‘and’, ‘the’ and ‘or’ are removed.
So for example, the title of this post is ‘WordPress Tutorials – Optional Post and Page Editing Features’ and the slug has been automatically set to ‘optional-post-page-editing-features’ to help form the address ‘https://phoenixweb.com.au/optional-post-page-editing-features’.
Optionally you can manually set the slug. To manually set the slug simply type it into the ‘Slug’ text box shown below.

Author
By default the author is whoever is logged in and creating the post. You can change who the author is by clicking the drop down in the ‘Author’ option box shown below.

If this option box isn’t visible in the post/page editing screen it probably needs to be enabled in screen options at the top of the page
What Next?
Learn how to work with pages in our WordPress pages tutorial.