Managing Users
Users are anyone who can login to the site and access something the general public can’t. If your website is a simple operation the only user you’ll have to manage is yourself.
Edit Your Profile
To manage your own profile:
- Using the navigation menu go to Users → Your Profile. The screen will look like the image below.

- Change options or add information pertinent to your account. Many options are optional but it is better to add as much information as you can. A description of some of these options is below.
- Personal Options
- Visual Editor ‘Disable the visual editor when writing’ – If you prefer to only write in HTML you could disable it. We recommend youleave this unticked.
- Admin Colour Scheme – Changes the admin screen colour scheme. This won’t affect the front end of the site.
- Keyboard Shortcuts ‘Enable keyboard shortcuts for comment moderation’ – Read more about this at the WordPress keyboard shortcuts page. We don’t tend to use them ourselves but you may find it handy to speed up comment moderation slightly. To learn more about comment moderation check out our comment moderation tutorial.
- Toolbar ‘Show Toolbar when viewing site’ – Normally when you Checking this hides the admin toolbar from you while logged in.
- Personal Options
- Name
- Username – This is the name you login with. It can’t be changed.
- First Name – Self explanatory
- Last Name – Self explanatory
- Nickname – Your nickname is automatically set as your username until you change it. It is often displayed on the front end.
- Display Name Publicly as – This is how your name is cited on various parts of the front end of the site.
- Contact Info
- E-mail – Your email address is used to login. Also WordPress often sends notifications about various happenings to this email.
- Website – Enter the address of your website here. This can be the actual website you are logged into or something different. A user who has their own website apart from yours will probably want to enter their own website here.
- About Yourself
- Biographical Info – A short description of yourself. This will appear in various places on some themes and sometimes not.
- Password – This field can be used to reset a user’s password. Simply enter the new password in the field, then repeat in the Repeat New Password field.
- Click ‘Update Profile’ found by scrolling to the bottom of the screen.
Many of these options only appear on your author page.
Plugin User Options
Some plugins add more options to user profiles. Two great plugins that we add to many WordPress installs are Jetpack and SEO by Yoast.
Jetpack
If you have the ‘Jetpack’ plugin installed you may have additional user profile options. These are:
- Post By Email – We don’t normally use this and can be ignored unless you really want this feature.
- Contact Info – Jetpack provides links to these social media on your author page if you have filled them in.
- AIM – AOL Instant messenger
- Yahoo IM – Yahoo Instant Messenger
- Jabber/Google Talk – Google chat program that few people use.
- Google + – link to your Google+ profile page
- Twitter username – Enter your twitter username if you have one.
- Facebook profile URL – link to your Facebook profile page
- Personal Options
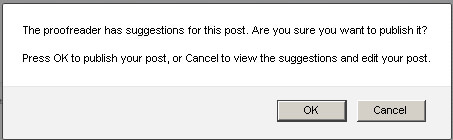
- Proofreading ‘Automatically proofread content when…’ – Proofreading can be handy for checking your mistakes.
- ‘Automatically proofread content when…’ – We normally leave these blanked out because when you click ‘Publish’ or ‘Update’ in the post editing screen you will get a message from WordPress. If you want to proofread your work you can click the proofreading button in the edit post window.
- Proofreading ‘Automatically proofread content when…’ – Proofreading can be handy for checking your mistakes.

SEO by Yoast
If you have the ‘SEO by Yoast’ plugin installed you may have these additional user profile options. They are:
- WordPress SEO settings
- Title to use for Author page – The title that appears for search engines
- Meta description to use for Author Page – Text that search engines use to show a snippet about the page.
Read more about titles and meta descriptions at this SEO article. These settings only really come into play if you have an author page in your theme.
Managing Users
To get to the user management screen use the navigation menu to navigate to Users → All Users. You will see a screen like the image below.

Adding a New User
To add a new user:
- Either
- Use the navigation menu to navigate to Users → Add New
- From the user management screen click ‘Add New’ near the top left of the screen.
- Fill in the details of the new user. Most of these are compulsory.
- Usually you would tick the checkbox to send the password to the new user by email.
- Choose a role for the new user. Read more about roles below.
- Click ‘Add New User’ at the bottom left of the screen.

Roles
Roles determine what a user has permission to do when they are logged in. By default the roles that WordPress comes with is:
- Administrator
- Editor
- Author
- Contributor
- Subscriber
An administrator can use all the capabilities of WordPress, an editor has slightly fewer capabilities than an administrator but more than an author and so on. Some plugins add new roles for example the WooCommerce plugin for setting up online shops introduces a shop manager role. Giving a user a more restricted role will:
- Stop them from making drastic changes to the site
- Make WordPress easier to learn as the user will have less buttons to push.
As an admin you set the user’s role when creating a new user or you can change it by editing their profile. You can read about roles in more detail at the WordPress Roles and Capabilities page.
Deleting a User
To delete a user:
- Use the navigation menu to navigate to Users → All Users.
- Hover over the user you want to delete. In the image above I am hovering over Joel Small’s row.
- Click the ‘Delete’ link that appears. You will see a screen like the image below.
- Select what will happen to content that this user authored. In the image below I’ve chosen to attribute it to myself. This means that I would become the author of any content that Joel Small was the author of.
- Click ‘Confirm Deletion’.

Note that you cannot delete your own user profile. If you really want to delete your own profile you’ll have to login to a different profile to do it.
Editing a Users Profile
If you are an administrator you can edit any user’s profile. To edit another persons profile:
- Use the navigation menu to navigate to Users → All Users.
- Hover over the user you want to edit.
- Click the ‘Edit’ link that appears.
- Editing another user’s profile is very similar to editing your own profile described above. The main difference is that when editing someone else’ profile you can also edit their role.
Resetting a User’s Password
To reset a user’s password:
- Use the navigation menu to navigate to Users → All Users.
- Hover over the user whose password you want to reset.
- Click the ‘Edit’ link that appears.
- In this screen there will be a field called ‘New Password’ and ‘Repeat New Password’. Enter a new password into these fields.
- Click ‘Update Profile’ at the bottom left of the page.
What Next?
Next tutorial is learning how to manage the widgets of your site.